You should be able after reading this, to perform simple forming methods for linear footings and pier footings for a basic foundation. I will cover optional ways to form foundation walls as well. Along the way I will leave you hints that will either be ways to save money, safety items or perhaps a reference or two for you to go to for more information if you need it.
Linear Footing Formwork: Linear footings is a fancy word for strip footings that you may have seen being placed under a new house or garage. They are the first basic piece in the foundation system you will need for your project. Linear footings may form a square, a circle, an arc or perhaps just a projection sticking out from the main building that will support a knee wall or a retaining wall.
Observe there will be several men involved as well as the use of wheelbarrows to haul the concrete and place it in the footing forms. Also note the small squares in the center of the excavation are for a pier footing that may support a column later on. The concrete is placed and leveled off flush with top of forms.
Materials: Materials for footings can range from dimensional lumber such as a 2″ x 12″ or 2′ x 10″ to plywood, scrap lumber pieces, or any other wood you have laying around. Typically, footing lumber can be used over and over again to save money. 12 penny,10 penny and 8 penny common nails, some string line, pencils, level, ruler or measuring tape and a tripod and bubble level. A tripod and level can be rented by the day from most Rental centers. They will show you how to set it up and use it if you need help. A string line bubble level is approximately $2.00 at most home hardware stores.
Tools: Long handled pointed shovels, short handle square shovel, hammers, pick, 12 pound sledge hammer, tie wire, and a chalk line box.
Reinforcement: In most parts of the country steel reinforcement is required in foundation footings. It could be 2-#5 bars continuous or 2-#6’s and this information will be shown on your building drawings. Reinforcement bar sizes are based on 1/8″ increments of 1″. So #5vbar is 5/8″ thick, #6 bar is 6/8 or 3/4″ thick and so on. Bars range from #3 to ##24 but will never see anything larger than a #7 in any typical house footing. Rebar (for short) is available at home centers, lumberyards and if you have a local steel supplier in the phone book, they may deliver as well. Rebar comes in 20′ or 30′ lengths with 20′ lengths which are easier to handle and are preferable. You can bend a #3, 4 or 5 in a simple jig made of stacked cement blocks or a trailer hitch on a pickup truck. It will take some effort but there aren’t that many to bend.
Cutting rebar may be done with a demolition saw or a skill saw with a carbide blade although that is much slower. WEAR SAFETY GLASSES AT ALL TIMES! Flying debris from the saw blade and sparks can cause serious eye injuries. Watch the sparks as well. Be aware of where you’re working and have a firm footing when doing this work. Make sure no one is standing in the path of the cutting debris or sparks.
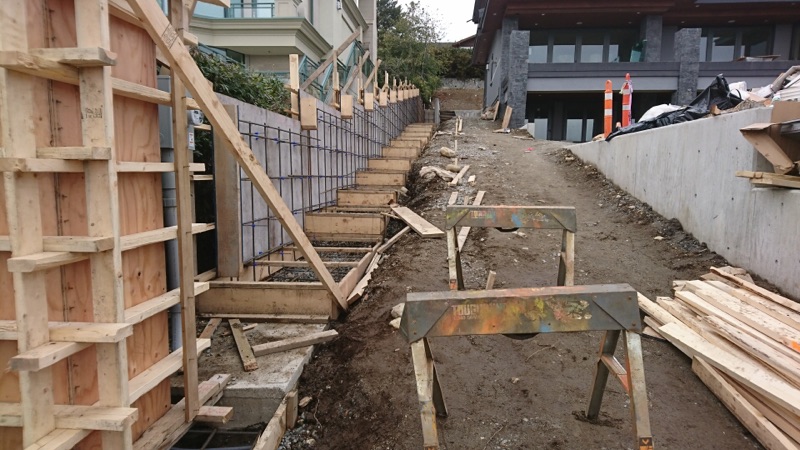
Rebar installed in a pier footing. Many footings have 2 or 3 continuous bars tied together end to end for added strength of the footing. Walls may have just vertical bars or both vertical and horizontal bars in them.
Installation: Here’s the fun part where you actually see something getting done. Once you have performed the layout of the building lines, you are ready to start installing the formwork. Remember, this is not cabinet or finished work that will be seen later on. It is simply a temporary form to hold the concrete in shape until it dries. When your concrete is hardened, YOU RIP ALL THE FORMS BACK OUT! While we are here, when you have finished and poured your footings, remove ALL wood from around the work. Leaving wood in place and burying it will draw insects and especially termites. They just love damp wood. This will be a serious problem later on. Take your time to clean it all out. Start in one corner of your foundation (we will for now assume it is a rectangle) and start laying out the longest lengths of lumber you have to use. Your drawings will tell you if your footing is 20″ wide and 10″‘ deep or 24″ wide and 12″ deep and so on. The first number given such as 24″ x12″ typically means the width of the footing is 24″, and the depth is 12″. Typical means this is the size used everywhere unless the architect shows a different size in a specific place. If your footing is 24″ x 12″, you would be using 2″ x12″ x 12′ or 10′ dimensional lumber marked as SPF. (Spruce, Pine, Fir). In different areas of the country, faming lumber could be Southern Yellow Pine, white pine or other most common and cheapest wood available. Remember, this is not structural framing lumber so there is no reason to buy the highest priced wood for this work. Buy the Cheapest!
OK so you worked your way all around the building and find out the building doesn’t fit your lumber lengths. Amazing! Say the building is 42′ long. by lapping your forms one foot each, you will only get 39′ from 4 10′ pieces and you need 42’. Now you are allowed to cut some pieces to fit the corners. Try to keep the cutting to a minimum so you can save your lumber for another project. OK, now we have lumber laid out all the way around the foundation. Holding the lumber in place can be done by several methods and all are fine.
Formwork can be held in place by using wooden stakes, steel stakes, perforated strapping steel tape, or wood spreaders. Steel stakes are quicker but are expensive to buy. If you can rent a box of 24 or 48, do so as they greatly speed up the work. If you are using wood stakes you have to purchase some 1″ x 3″ x12′ lumber for cutting of stakes. If your ground is very soft or wet, the stakes may have to be 30″-36″ long, if the ground is firm 24″ long stakes will do. Cut a point on each stake and make a couple of dozen of them to start. Stand your first footing form directly under you layout line and drive a stake alongside on the outside! You have to be able to remove them later. Now keeping the form under your layout line, move along the board and place another stake at the other end keeping the entire length of the board under the string line. Make sure your form is in line with the foundation footing layout line. Place your second form alongside the first on the outside and lap it 1″ over the first. Drive a 16 penny duplex nail in the lap to hold it while you work along. Third form; place it to the inside of the 2nd board, lapping it one foot as well. Nail these together from the outside! Continue on around the footing until you have stood forms for the entire exterior of the footing including corners. Lapping in and out all the way around. Now start your inside form. Stand the board 24″ away from the outside form board and hold it in place with either a 28″ piece of the 1″ x3″ lumber scrap keeping a minimum of 24″ between the forms. The building inspector will check this dimension. He/she does not care if it’s slightly larger but he/she will fail it, if it’s less than 24″. Again work all the way around your footing until you have a full rectangle with a form board for both the inside and outside of your footing in place.
Now is the time to begin making your forms strong enough to hold the weight of the concrete. Starting in one corner, add enough wood stakes, nailing each one as you go to the formwork with 10 penny duplex nails. Steel stakes have pre-drilled holes in them so you simply insert the nail in a hole and drive it in. Continue this until one side is secured soundly. Now stand the inside forms making sure you maintain the minimum width required by your drawings. Install “spreaders” made of scrap lumber across the top of the forms to hold them apart and help hold them from tipping over when the concrete is placed inside. Continue on all the way around the footings until all forms are nailed and staked. NOTE: As you proceed with the formwork, using your level and tripod, make sure the forms are LEVEL! They are of no use if they weave up and down and will make installation of the foundation itself, nearly impossible. If you encounter rock or other obstruction, ask your building inspector how he/she wants to see the footing formed at that location. They may allow you to pin the rebar to the rock, ask that some of the rock be removed to provide a level surface and so on. Now install the rebar. Just slide the long lengths under your spreaders making bends at the corners. Using tie wire, hang the bars from the spreaders so the rebar is located within the bottom 1/3 of the footing height. 12″ high footing? Hang the bars 3-4″ above the ground. This will help provide the strongest footing you can make. When all rebar is complete, call for inspection and take a rest.
Placing the concrete: When pouring a large footing or foundation, you will most likely purchase the concrete from a Redi-mix concrete supplier. They will want to know, how many yards you need, what strength concrete and what time of day you would like it to be on site. Have your information ready. Order two days before you need it and check again on the day it is supposed to be delivered to make sure there will not be any delays. Weather, plant breakdowns and even manpower can sometimes delay truck delivery times. They will get there as closely to the hour you requested as possible. BE READY! When the truck shows up is not the time to find out you have a flat on the wheelbarrow or can’t find the shovels. Have your tools and manpower ready. Most companies allow up to 1 hour on site for unloading. After that you pay additional time charges for the truck and the driver. It can get costly! Unless you are superhuman and very well experienced do not try and unload 10yds of concrete with only 2 people. You most likely will spill more than you use, the concrete will get hard before you finish it and rushing around can cause an injury. Be prepared with sufficient manpower.
After the concrete is placed in your forms and roughly troweled off to the top of the forms, take a few minutes break. The concrete will start to setup and if your plans call for vertical bars in the footings for the new foundation walls, this is the time to install those. They should all be pre-made and laid out roughly where they are to go in the footings. Again, plan ahead. You may “stab” these rebar into the wet concrete, wiggling them around slightly to get the concrete to fill in around the hole you made. Your plans will tell you if the bars go on the inside or outside “face” pf the wall or in the center and how far apart they are to be. “Inside” and “Outside” face simply means the inside or outside of the new all. Most times the bars are to be placed 2″ away from the face. Your drawings will tell you this information. Starting in one corner, install one bar in intersection of the corner and then measure whatever dimension the drawing shows for centers. 32″ on center (O.C.). Just measure over 32″ and install the next bar and so on. When you come to the next corner, make sure one bar is at the corner intersection center again. You can add extra bars of you have a question, just don’t add too few.
Next day. Now that you found the muscles you never knew you had (just a little sore?) it is time to strip all the formwork off the footings. Yes all that great form work you did is now just scarp lumber pile material. Take ALL wood out of the foundation area. Rotting wood underground draws termites and other nasty insects! Footings are complete.
Foundation forms completed and filled with concrete. Not child’s play!
Foundation walls: Walls may be constructed of concrete block units (Masonry or CMU), poured concrete, pressure treated wood and today even Styrofoam foundation blocks are available. Whatever the type you are using, if you did a good job on your footings and they are nice and level, the walls are going to be easy to install. If your foundation is masonry, your work is done. Your mason will now layout the wall locations, lay the CMU, pour the CMU cells that have the rebar in them and install the straps for the sill plate for the house, shed, garage, etc. Make sure his contract includes all this work and materials. If the foundation is concrete, the concrete contractor will bring all the forms with him. Again, make sure all the formwork, wall ties, rebar required, windows and other accessories are included in his contract. It is possible for a homeowner to form and pour a foundation but it is not child’s play. For rentals, rebar installation for the walls, actual placement of the concrete, how to use the trucks properly and possibly the use of a concrete pump are all best left to the pros. Concrete is extremely heavy when wet. Improperly constructed wall forms can result in a “blow-out” of the formwork and serious injury or death can result.
Footings are the basic and first building block of your project. Sheds may sit only on 4 solid concrete blocks but those are the footings. They too must be solid and level to provide a good footing for your shed. Take your time and do it right and the rest of your building will be easier to keep plumb and level.
Hopefully this has given you lots of ideas and information on the right and wrong ways to install footings. Whether it is a large or small project, the theory is the same. Take your time to read your drawings, always use safety glasses when using a power tool or placing concrete.
Pete
Your Friendly Building Inspector http://www.Wagsys.com
BICES-Building Inspection & Code Enforcement System Software
Pete is a 30+ year building inspector with experience in both public and private construction industries. From schools to treatment plants, from private homes and condo projects, to large residential landscaping projects, he has worked both in the building design areas and field construction in the Eastern US. In 2006 he formed along with two other building inspectors, Wagsys LLC which produced software for municipal agencies in the fields of building departments, planning boards and Zoning Boards of Appeals.
Article Source: How to Form Building Footings